Add Workflows (Modern View)
This topic describes how to add a workflow using the modern view designer. You can perform all the tasks in this window that you can perform in the classic designer.
To add a workflow using modern view designer
- In Easy Workflow Cockpit, select Manage > Workflows. The Workflows window is displayed.
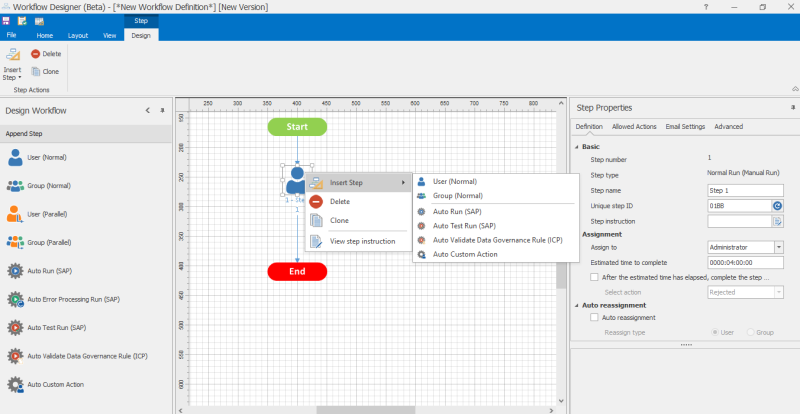
- Select Add > Modern View . The Workflow Designer (Beta) - [*New Workflow Definition*] [New Version] window with the basic template of a single-step workflow is displayed.
-
Select Start in the drawing. The Properties pane with the Basic and Advanced tabs are displayed.
- On the Basic tab, enter the workflow information, such as the name, priority, workflow image, and other details. Optionally, select the default template for the workflow.
- On the Advanced tab, perform the following steps:
- In Email notifications, select the email notification template that must be used to send an email at different workflow stages. Optionally, use the Create Email Template option to create additional templates.
- In Completion settings, select the options to indicate the following:
- Work item must be closed when a step is approved or rejected.
- Workflow must be completed when a step is rejected.
- Work item cannot be opened or can be opened in either read-only mode or read-write mode from My Workflow History and All Workflow Items(Other) after the workflow run is complete.
- In Save workflow history when, select the options to indicate when the work item details must be saved.
- In Define Custom fields, add the fields that can be used in custom code for step action settings, custom code for auto custom action, and email notifications. Perform the following steps to add custom fields:
- Select Append, enter the display name in the Field Text box, and select values for Active, Optional, and Visible in Inbox Grid depending on the needs of your organization. For example, select Active if the custom field must be displayed in Workflow Action - Approve and Workflow Action - Reject windows during the workflow run, Edit Custom Fields window from the Easy Workflow Inbox tabs, and in the reports; select Optional if the user does not have to enter a value during the workflow run; select Visible in Inbox Grid if the custom field must be visible in the Easy Workflow Inbox tabs as an additional column.
- In Editable at Steps, select the steps at which the custom field value can be viewed and edited. For the Selected Steps Here option, you must also select the specific steps.
- Select the type of control in Control Type and select the value for fields such as Comparison Operator, Value, or Length; these fields are available only for some of the control type options. For example, the Comparison Operator field is valid only for Number TextBox control type.
Note: You can add up to 15 fields. For information about using custom fields in post step action and its impact on the routing of workflow, see Use Custom Fields in Post Step Action. For information about using custom fields in email templates, see Manage Email Templates. For information about how to create filters based on custom fields, see Filter on Work Items.
- In Configure Substatus, select one of the following options:
- Specific text: Users must enter the text for the substatus.
- Pre-defined text: Users must select a substatus option from the predefined values.
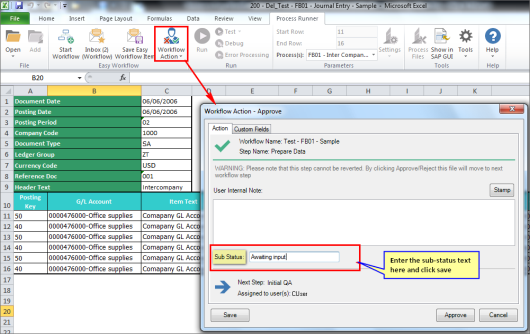
You can view the substatus in the Easy Workflow Inbox and the Pending Workitems List window that is displayed when you click the Total Pending Workitems option in the Easy Workflow Cockpit Dashboard.
-
Select the step in the drawing and perform the following steps:
- On the Definition tab, enter the information such as the step name, unique step ID, step assignment details, step instructions, step reassignment details, and step action settings, which allows you to enter the custom code in the custom code editor and also select the option if the reason for rejecting the step is required. Note that when you refresh the unique step identifier, it gets reflected in the Post Step Action (Goto step) automatically. However, you must update the identifier if it is used in custom code.
Note: You can assign the step to any user who has the Can be assigned to workflow steps option selected in their user role or use Custom Table Filter Builder to assign the step to users based on the values in custom tables. For information about how to use the custom table filter builder option, see Use Custom Table Filter Builder.
- If you are adding manual or parallel step types, on the Allowed Actions tab, you can select the following options:
- Excel permissions to allow users to perform either read-only or read/write tasks on the Excel file.
- Supporting documents to allow users to attach supporting documents.
- Segregation of duties to allow users to act on the step if the user has already acted on another step in the workflow depending on whether the workflow is iterative.
- Run actions > Allow run actions on Process to select the run types for all the Processes or specific Processes that are available for users as follows:
- All Process in the template > All run actions: Indicates that all the SAP run types that are valid for the specific Process file type are available at the time of running the workflow. For example, if you select All run Actions and the workflow is then started on a Data Extractor Process file, then only Run is available for the step.
- All Process in the template > Specific run actions: Indicates that only the selected SAP run types are available for the Process file that you select at the time of running the workflow. For example, if you select Run and Test Run and the workflow is then started on a BAPI/RFM file, then only Run is available for the step, even though both run and error processing are valid run types for a BAPI/RFM file. As another example, if you do not select Run and Debug Run and the workflow is then started on a Transaction file, then these options are not available for the step.
- Specific Process, transaction code, BAPI, table view, or technology: Indicates that only the selected SAP run types are available for the specific Process, transaction code, BAPI, table view, or technology. For example, if you select Transaction code, BAPI, table view, enter FB01 in the Process column, and select Debug Run and Error Processing Run, and the workflow is then started on the FB01 file, then only Debug Run and Error Processing Run are available for the step.
Note: We recommend that you do not use the Transaction code, BAPI, table view or Process matches with options with any of the other four options.
- On the Email Settings tab, select the email notification template that must be used to send an email at the different step statuses and the email attachments that must be sent with the email. The email attachments can include the work item file, work item shortcut file, PDF of the work item, or reports of the work item.
- On the Advanced tab, enter the custom labels for approve and reject actions. If you customize the labels, you must add the custom labels to the list of keywords in Email Runner in addition to the keywords for the default labels.
- On the Definition tab, enter the information such as the step name, unique step ID, step assignment details, step instructions, step reassignment details, and step action settings, which allows you to enter the custom code in the custom code editor and also select the option if the reason for rejecting the step is required. Note that when you refresh the unique step identifier, it gets reflected in the Post Step Action (Goto step) automatically. However, you must update the identifier if it is used in custom code.
- To add a step, perform one of the following tasks depending on where you want to add the step:
- To append a step, drop the step type from the Append Step section to the drawing pane.
- To insert a step before the current step, select the step in the drawing pane, right-click, select Insert Step, and select the step type.
- Repeat step 4 for every manual or parallel step that you add.
- If you are adding Auto Run (SAP), Auto Error Processing Run (SAP), Auto Test Run (SAP), or Auto Validate Data Governance Rule (ICP) step type, perform the following additional steps on the Definition tab:
- In Auto task parameters, enter the names of the process and sheet that must be used for the autorun task and the estimated time for the autorun task to be completed.
Note: For Auto Error Processing Run (SAP), you must also select an option in Column for error processing to indicate if the error must be processed based on the error column as specified in the Process file or the column value that you enter. Ensure that you enter the correct column because the column value is only validated at the time of the workflow run, and not while defining the workflow.
- In SAP logon information, select the logon type and provide additional information such as the logon shortcut to use or the step at which the user must provide the SAP logon information depending upon the step status. For information about how to create a shared logon shortcut, see Shared SAP Logon Shortcut section in Using Other Options topic.
Note: The Ask for logon option is available only from the second step onwards and the SAP logon not required option is available only for the Auto Validate Data Governance Rule (ICP) step type.
- In Step action, select the option to indicate the action that must be taken when the run is completed.
- In Auto task parameters, enter the names of the process and sheet that must be used for the autorun task and the estimated time for the autorun task to be completed.
- If you are adding Auto Custom Action step type, enter the custom code in the custom code editor. You can use Info available in the custom code editor for information about parameters that the custom code receives and returns.
- Optionally, select Delete to delete the step or Clone to insert a duplicate of the step after the current step.
- After adding the steps to the workflow, select Validate in the title bar. The workflow is validated.
- Select Save. The workflow is saved.
When you run the workflow, the step instructions and the custom labels appear in sections, such as Workflow Action and Quick WorkItem Details Pane.
Related Topics:


