Manage Email Templates
This topic describes how you can manage email templates, which are displayed in the workflow designer window when designing a workflow.
You can use the Export to Excel option to export the details about the email templates, such as when and who last updated the template, to an Excel workbook. You can use the Show Filter Row option to filter data by entering text in a column and the Show Find Panel option, which is available when you right-click a column header, to search for text in the Email Template Settings window. Also, you can right-click the column header and customize the columns that appear in the Email Template Settings window using the Column Chooser or Hide This Column options.
To manage email templates
- In Easy Workflow Cockpit, select Settings > Email Templates. The Email Template Settings window is displayed.
- To add a template, select Add. In the Email Template Design window, perform the following steps:
- Select Active. The template will be displayed in the list of templates in the workflow designer window.
- In Show only for, select the action for which this email template can be used.
- Select Use as Default to set the template as the default for the option selected in Show only for. For example, if you create a template,
TestTemplate, and set this as the default template for 5 - Sub Status change of step in Show only for, thenTestTemplateis displayed as the default template for the When Sub Status of Current Step is Changed option in the Email Settings tab of the workflow designer window. - In Template Name and Subject, enter a name for the template and a short description for the template.
- In To and CC, perform one of the following tasks to enter the email IDs of the users who must receive this email notification:
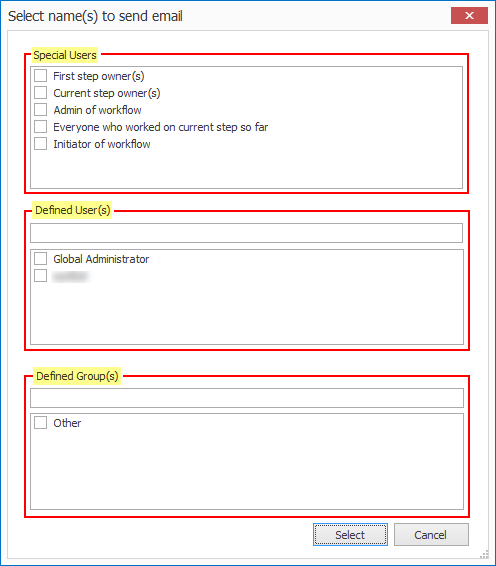
- Double-click the To or CC box, and select the users from the list that is displayed in the Select name(s) to send email window; the users and user groups defined in the Easy Workflow Cockpit are displayed in Defined User(s) and Defined Group(s) sections.
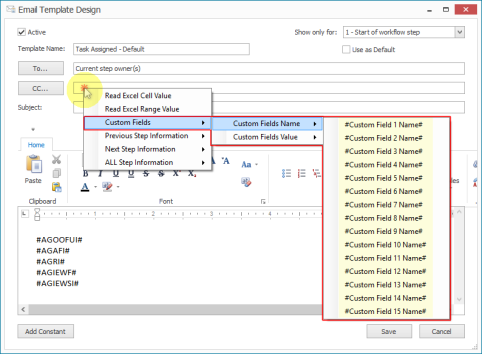
- Right-click in the To or CC field and map Excel cell value or custom fields as email address.
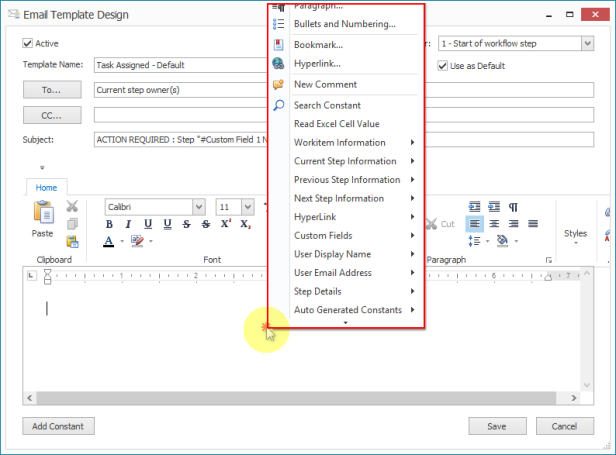
- In the body of the email, right-click to view the list of constants or click Add Constant.
- From the list that is displayed, select the constant that will be updated with the values at runtime when the mail is sent to the user.
- Select one or more of the following options and the required constants:
- Workitem Information
- #Workflow Name# : Displays the workflow name.
- #Excel File Name# : Displays the work item file name.
- #Excel File ID# : Displays the work item file ID.
- #Workflow Priority# : Displays the workflow priority.
- #Workflow Status# : Displays the workflow status.
- Current Step Information
- #Step No# : Displays the current step number. This constant is useful in any email template.
- #Step Name# : Displays the name of the current step. This constant is useful in any email template.
- #Step Action# : Displays the approve or reject action performed on the current step. This constant is useful in any email template.
- #User Name# : Displays the Windows User name who performs the action on current step.
- #User Email Address# : Displays the email address of the Windows User ID who performs the action on current step.
- #User Comment# : Displays the comments entered by user on approval and rejection of current step. This must not be used in start of workflow step template and any error reporting templates.
- #Error message at workflow step# : Displays the error message of current step. This constant is useful in error reporting templates.
- #Sub Status at Current Step# : Displays the sub-status selected or entered by user when the workflow is run. This constant must be used only in sub-status template.
- Previous Step Information
- #Previous Step Comment# : Displays the comments entered in the step prior to the current one.
- #Previous Step User# : Displays the name of the user who performed action on the previous step.
- #Previous Step Substitute User# : Displays the name of the substitute user who performed action on the previous step.
- #Previous Step Last Action User# : Displays the name of the user who performed action on the previous step.
Note: All the Previous Step Information constants can be used in start of workflow step template, but not in email templates for approval and rejection of workflow steps.
- Next Step Information
- #Next Step User# : Displays the name of the user who will perform action on the next step.
- #Next Step Substitute User# : Displays the name of the substitute user who will perform action on the next step.
- HyperLink
- Link to Approve: Displays the link to approve the workflow.
- Link to Reject: Displays the link to reject the workflow.
Note: For the hyperlink constants, you can customize the Click here to Approve and Click here to Reject hyperlink text and the custom text will be displayed in the email notification.
- Custom Fields
- Custom Fields Name: Displays the custom field name.
- Custom Fields Value: Displays the custom field value.
- User Display Name
- Initiator of Workflow: Displays the initiator of the workflow.
- Current Step Owner(s): Displays the names of the current step owners.
- Admin of Workflow: Displays the name of the workflow administrator.
- Global Administrator: Displays the name of the global administrator.
- User Email Address
- Initiator of Workflow: Displays the email address of the initiator of the workflow.
- Current Step Owner(s): Displays the email address of the names of the current step owners.
- Admin of Workflow: Displays the email address of the workflow administrator.
- Global Administrator: Displays the email address of the global administrator.
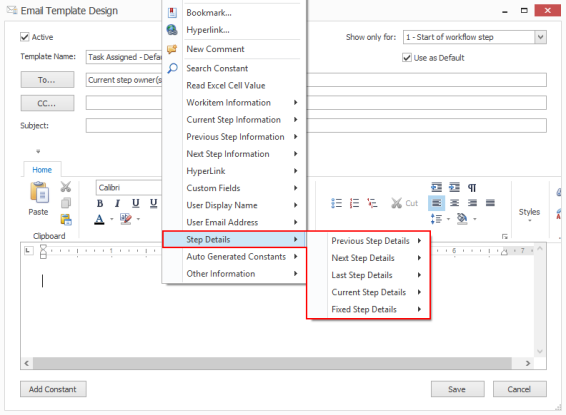
- Step Details > Previous Step Details
- #SDSN# - Step Name: Displays the name of the previous step.
- #SDS# - Step Status: Displays the status of the previous step.
- #SDST# - Step Type: Displays the step type of the previous step.
- #SDSOUN# - Step Owner User Name: Displays the name of the user that the previous step is assigned to.
- #SDSODN# - Step Owner Display Name: Displays the display name of the user that the previous step is assigned to.
- #SDSOE# - Step Owner Email Address: Displays the email address of the user that the previous step is assigned to.
- #SDACBYUN# - Last Action By User Name: Displays the name of the user who performed the action on the previous step.
- #SDACBYDN# - Last Action By Display Name: Displays the display name of the user who performed the action on the previous step.
- #SDACBYE# - Last Action By Email Address: Displays the email address of the user who performed the action on the previous step.
- #SDUC# - User Comment: Displays the comments entered by the user on approval or rejection of steps.
- #SDSOA# - Source of Action: Displays the step action given by the user.
Similar constants are also available for Next Step Details, Last Step Details, Current Step Details, and Fixed Step Details.
We recommend the following:
- Use Step Details > Current Step Details constants instead of the Current Step Information constants.
- Use Step Details>Previous Step Details constants instead of the Previous Step Information constants.
- Use Step Details > Next Step Details constants instead of the Next Step Information constants.
- Auto Generated Constants
- #AGOOFUI# - Out of office User Information: Displays the out-of-office user information.
- #AGAFI# - Attachement File Information: Displays the information of the attached work item.
- #AGRI# - Reassignment Information: Displays the information of the user to whom the task is reassigned automatically by Easy Workflow service.
- #AGIEWF# - Generated by Innowera Easy Workflow: Displays the text,
Auto generated by Innowera Easy Workflow. - #AGIESI# - Innowera Easy Workflow Service Information: Displays the Easy Workflow service information. For example, the computer name on which the service is installed.
- Other Information
- #Process Name# : Displays the name of the Process file that is run.
- #All Step Owner# : Displays the names of all step owners in the workflow definition.
- #All Step Substitute user# : Displays the names of all the substitute users in the workflow definition.
- #Server Name# : Displays the computer name on which the Easy Workflow service is installed.
- #CTFBERROR#- Custom Table Filler Builder Query Error/Warning: Displays the error message that has occurred in a custom table.
- Workitem Information
- To edit a template, select the template, select Edit, and enter the template details in the Email Template Design window.
- To copy a template, select the template, select Copy, and enter the template details in the Save As Template window.
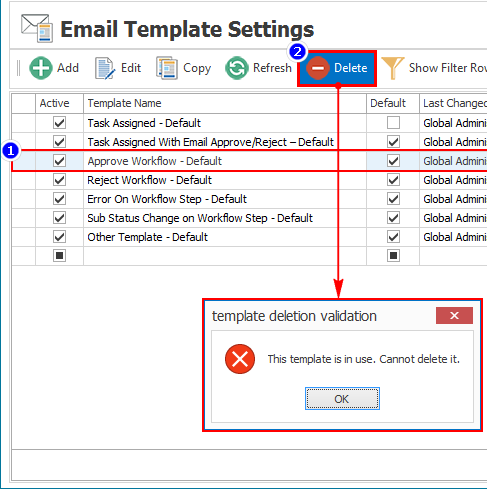
- To delete a template, select the template, and select Delete. You cannot delete an email template if an in-progress workflow is using it, or if it is the only default template assigned to a workflow action.
Related Topics: