Configure Basic Step Definition
This topic describes how to add configure the basic step definition of a workflow that is composed of one or more steps. These steps control the workflow and describe the business activities for which the workflow is designed.
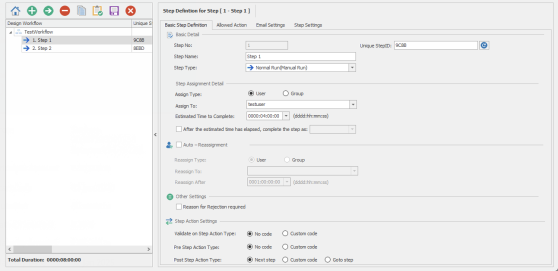
To configure basic step definition
- In the Workflow Designer - [*New Workflow Definition*] window, select the workflow step that you want to configure.
- On the Basic Step Definition tab, enter the following information in Basic Detail section:
- Step No: Indicates the step number of the step in the workflow definition.
- Unique StepID: Indicates the unique identifier for the step.
Note: When you refresh the unique step identifier, it gets reflected in the Post Step Action (Goto step) automatically. However, you must update the identifier if it is used in custom code.
- Step Name: Indicates the name for the step. You can enter up to 300 characters.
- Step Type: Indicates whether the step in the workflow will be run manually or automatically. For more information about the different step types, see .
- If the step type is Normal Run (Manual Run) or Start with previous step (parallel step), perform the following steps:
- In Step Assignment Detail section, enter the following information depending upon whether you have selected user or group for Assign Type:
- Assign To: Displays the list of users or groups who can be assigned the workflow step. Workflow step can be assigned to the user who begins the workflow by selecting Initiator of Workflow or any user who has the Can be assigned to Workflow steps option selected in their user role. Custom Table Filter Builder allows routing of workflow steps to users based on values in custom tables. For information about the custom table filter builder, see Use Custom Table Filter Builder.
- Estimated Time to Complete: Indicates the estimated time to complete the step.
- To complete the step after the estimated time has elapsed, select After the estimated time has elapsed, complete the step as, and then select the option from the drop-down list. For example, if you have set the estimated time to complete the step as 20 minutes and selected the option to approve the step after the estimated time has elapsed, the step will be automatically marked as approved if no user action is taken within the estimated time of 20 minutes.
- In the Auto-Reassignment section, enter the following information depending upon whether you have selected user or group for Reassign Type:
- Reassign To: Displays the list of users or groups who can be reassigned the workflow step after the specified time.
- Reassign After: Indicates the time after which the current step is reassigned to the other user or group. If this value and the estimated time to complete the step are the same, then the step will be completed instead of getting reassigned. Additionally, the step will be displayed as approved, rejected, completed, or terminated if you have selected an option in the After the estimated time has elapsed, complete the step as list.
- In the Other Settings section, select Reason for Rejection Required if the user rejecting the workflow step must provide a reason to reject the step.
- In Step Assignment Detail section, enter the following information depending upon whether you have selected user or group for Assign Type:
- If the step type is Auto Run (SAP), Auto Error Processing Run (SAP), Auto Test Run (SAP), or Auto Validate Data Governance Rule (ICP), perform the following steps:
- In Auto task parameters section, enter the names of the process and sheet that must be used for the auto-task and the estimated time that is required for the auto-task to be completed.
- For Auto Error Processing Run (SAP), select one of the following options in Select Column for Error Processing:
- Based on process file: Indicates that the error column as specified in the Process file is used for error processing.
- Based on column where error is stored: Indicates that the column value you enter in the box is used for error processing. Make sure that the column you specify is correct because the column value will be validated only at the time of the workflow run, and not while defining the workflow.
- In SAP Logon Information section, select one of the following options:
- Shared Logon shortcuts: Indicates that the SAP system you select from the Shared SAP Logon Shortcut box will be used during the workflow run. For information about how to create a shared logon shortcut, see Shared SAP Logon Shortcut section in Using Other Options topic.
- Ask for Logon: Indicates that the SAP system must be selected by the user at the specified workflow steps, depending upon whether the steps are approved or irrespective of whether the steps are approved or rejected. This option is available only from the second step onwards.
- SAP Logon not required: Indicates that the user does not have to provide the SAP logon information for the workflow step. You can run only the Auto Validate Data Governance Rule (ICP) step type without the SAP logon information.
- In When automatic run/test run process is completed, take following Approve/Reject decision section, select one of the options that indicates the action that must be taken when the run is completed.
- In Step Action Settings section, select one of the following options, and then select Custom code to write your Visual Basic validation code in the editor:
- Validate on Step Action Type: Indicates that the custom code provided in the Validate Step Action (Custom code) must be run before approving or rejecting the current step. This option is valid for only Normal Run (Manual Run) and Start with previous step (parallel step) step types.
- Pre Step Action Type: Indicates that the custom code provided in the Pre Step Action (Custom code) tab must be run before the current step is started. For example, this option is useful to format the Excel file before it is opened. However, we recommend that you perform the action in the post script of the previous step instead of using the Pre Step Action Type for the current step.
- Post Step Action Type: Indicates that the custom code provided in the Post Step Action (Custom code) tab must be run after the current step is completed or that the step must go to a specific step after the current step is completed as indicated in Post Step Action (Goto step) tab; in such a scenario, certain workflow steps will be skipped. You can use the step number or unique step ID to go to a specific step.
- If the step type is Auto Custom Action, provide the custom code in the custom code editor.
- Save the changes.
Note: You can use Info Help available in the custom code editor for information about parameters that the custom code receives and returns.
Related Topics: