Configure Step Settings
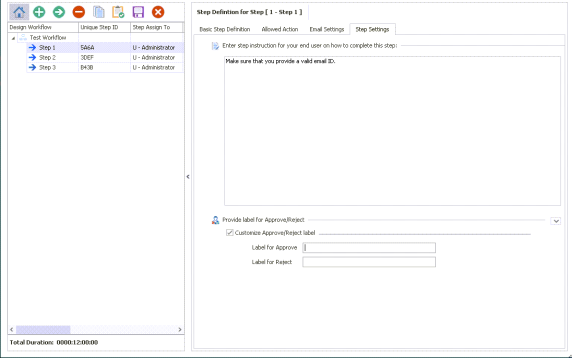
You can use the Step Setting tab to provide step instructions for workflow steps to assist users in completing the workflow steps. For example, a step instruction can state that the date must be specified in the yyyy-dd-mm format for a workflow step or that a valid email ID must be provided. A step instruction can also include information about design considerations and exceptions that might appear when the user performs the step.
You can also use the tab to customize the Approve and Reject labels for each workflow step. For example, you can use this feature to provide custom labels, such as Submit and Cancel, instead of the default labels, Approve and Reject.
When you run the workflow, the step instructions and the custom labels appear in sections, such as Workflow Action and Quick WorkItem Details Pane.
Important: If you customize the labels, you must add the custom labels to the list of keywords in Email Runner in addition to the keywords for the default labels.
To provide step instructions and customize approve and reject labels
- In Workflow Designer window, select the required workflow step.
- On the Step Setting tab, in Enter step instruction for your end user on how to complete this step, enter the step instruction that the user must follow when performing the step.
- Expand Provide label for Approve/Reject, and then select the Customize Approve/Reject label check box. The options to customize the labels are enabled.
- In the Label for Approve and Label for Reject boxes, specify the labels that you want to use for the workflow step. For example, specify Submit and Cancel instead of Approve and Reject.
- Save the changes.
A screenshot that shows the step instruction and custom labels for a workflow step is as follows.

Related Topics:

