Add Workflows (Classic View)
This topic describes how to add a workflow in Easy Workflow Cockpit using the classic view designer. You must add a workflow, and then define the workflow steps before a user can run the workflow.
To add a workflow using classic view designer
- In Easy Workflow Cockpit, select Manage > Workflows. The Workflows window is displayed.
- Select Add > Classic View. The Workflow Designer - [*New Workflow Definition*] window is displayed.
- On the Basic tab, enter the following information in Workflow Detail, Default Template, and Admin/Security sections:
- Active workflow: Indicates that the workflow is displayed in the list of workflows when starting a workflow.
- Archive workflow: Indicates that the workflow items for the current workflow will be archived.
- Name: Indicates the name of the workflow. You can enter workflow name up to 300 characters.
- Priority: Indicates the priority for the workflow.
- Member Of group(s): Indicates the workflow groups for this workflow.
- Description: Indicates the workflow description.
- Default Template: Indicates the template that is automatically used when starting the workflow. Default template is required when defining Auto Run (SAP), Auto Error Processing Run (SAP), Auto Test Run (SAP), or Auto Validate Data Governance Rule (ICP) step type.
- Workflow Admin/Owner: Indicates the user who is the admin for the new workflow, from the list of users.
- Password: Indicates the password that a user must specify to edit or delete the workflow. This password prevents unauthorized changes to the workflow definition.
Important: Because a single EShare file can be assigned to multiple workflows, exercise caution when you are editing such an EShare file in the EShare Edit server file window.
- On the Advanced tab, enter the following information in Workflow Sub Status, Completion Settings, and Other Settings sections that allow users running the workflow to define sub-status for a workflow item, configure post workflow settings, and enable the option to save the workflow history:
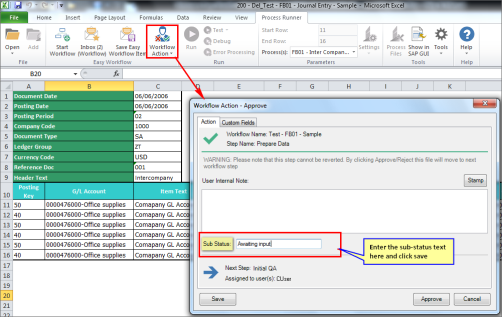
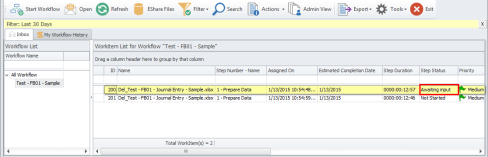
- Allow user to provide sub-status for this workflow: Indicates that the user who has been assigned the workflow can write or select sub-status text. The sub-status text can indicate any event that the user is waiting for before the step can be approved or rejected. The sub-status text is displayed to all the users in Easy Workflow Inbox window, Easy Workflow Overview window and Reports in Easy Workflow Cockpit.
- Allow User to type the sub-status text as desired by the user: Indicates that the user can take action on the step to write their own text to indicate the current state of the step to other users. When the user selects Save, the status text is saved.
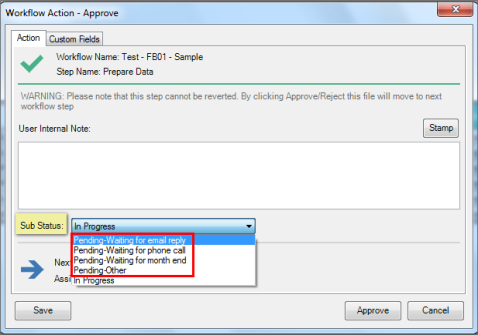
- User must pick sub-status from these pre defined values: Indicates that you can add statuses in the text box under this option and when enabled, allows user to select status for any given step from the predefined values that are displayed.
You can view the substatus in the Easy Workflow Inbox and the Pending Workitems List window that is displayed when you click the Total Pending Workitems option in the Easy Workflow Cockpit Dashboard.
-
Close Excel file when any step is Approved/Rejected: Indicates that the Excel file is closed on approval or rejection and user has to open the file from the Easy Workflow Inbox window again to work with it. If this option is not selected, the file is reopened from the server with respective privileges on approval or rejection of a workflow step.
- What happens to the file when workflow completes:
- Do not open file: Indicates that the user cannot open the work item file from My Workflow History and All Workflow Items(Other) after the workflow run is complete.
- Open file in read only mode: Indicates that the user can open the work item file from My Workflow History and All Workflow Items (Other) but cannot perform any action on it after the workflow run is complete.
- Open file normally: Indicates that the user can open the work item file from My Workflow History and All Workflow Items (Other) and can edit it even after the workflow run is complete.
- Mark workflow completed if any step is Rejected: Indicates that if any step is rejected in the workflow, the workflow run is marked as complete and does not go to the next step.
- Save Workbook History on operation: Indicates that the Excel file is saved in the database on the selected action performed on a work item. We recommend that you use this option, which is useful for auditing, only for those workflows where Excel file versions are required at all stages because selecting this option leads to an increase in the database size.
- In the Custom Fields tab, you can add custom fields (maximum of 15 fields) to store user-defined data, such as messages or a list of values, that can be used in custom code for Validate on Step Action Type, Pre Step Action Type, and Post Step Action Type. Perform the following steps to add custom fields:
- Select Append, enter the display name in the Field Text box, and select values for Active, Optional, and Visible in Inbox Grid depending on the needs of your organization. For example, select Active if the custom field must be displayed in Workflow Action - Approve and Workflow Action - Reject windows during the workflow run, Edit Custom Fields window from the Easy Workflow Inbox tabs, and in the reports; select Optional if the user does not have to enter a value during the workflow run; select Visible in Inbox Grid if the custom field must be visible in the Easy Workflow Inbox tabs as an additional column.
- In Editable at Steps, select the steps at which the custom field value can be viewed and edited. For the Selected Steps Here option, you must also select the specific steps.
- Select the type of control in Control Type and select value for fields such as Comparison Operator, Value, or Length; these fields are required only for some types of control type options. For example, the Comparison Operator field is valid only for Number TextBox control type.
Note: For information about using custom fields in post script and its impact on the routing of workflow, see Use Custom Fields in Post Step Action. For information about using custom fields in email templates, see Manage Email Templates. For information about how to create filters based on custom fields, see Filter on Work Items.
- In the Workflow Email Notification tab, configure the settings to send an email notification using the templates defined for activities related to a workflow. Enable the options to send notifications to the workflow administrator or other users when a workflow is started, completed, terminated, or stuck because of the SOD restriction.
- Select Save.
- Perform the step definition task for the default step of the workflow. For more information, see .
- Optionally, select Append to add steps to the workflow, Insert to insert a step before the current step in the workflow, Remove to delete the selected step from the workflow, Clone to insert a duplicate of the current step after the current step, and Validate to validate the workflow definition such as the name of the workflow, workflow step flow (except custom code), and fields.
- Select Save. The workflow is added.
- Optionally, select Refresh. The list of workflows is refreshed.
Note: Ensure that the email templates are created in Settings > Email Templates for the templates to appear in the list of available templates.
Related Topics: