Manage Custom Table Entries
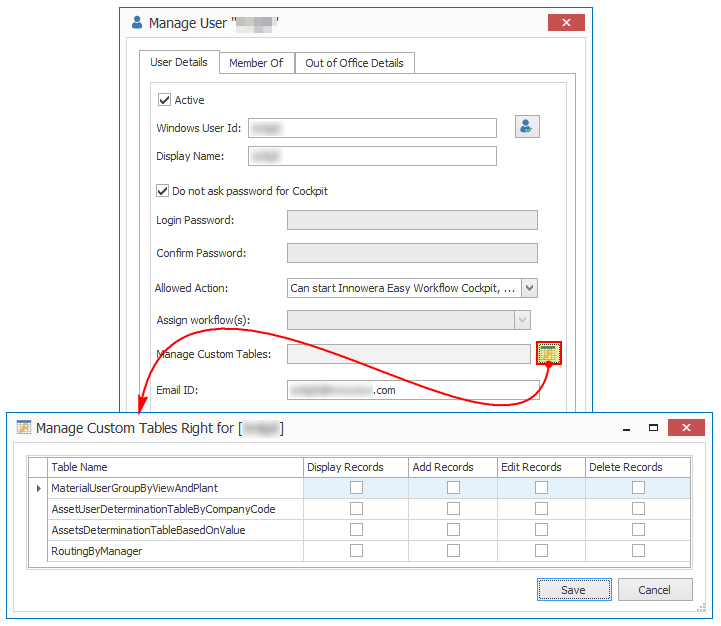
This topic describes how to manage custom table entries. You can manage custom table entries only if your user profile has the Can Manage Custom Tables option selected. For example, to edit the table entries of AssetUserDeterminationTableByCompanyCode, you must select the table in the list that is displayed in the Manage Custom Tables Right for[<WindowsUserID>] window when you select the Can Manage Custom Tables option in your user profile.
To manage custom table entries
- In Easy Workflow Cockpit, select Manage > Custom Tables. The Custom Tables window is displayed.
- Select a table whose entries you want to edit, and select Manage Custom Table Entries. The Manage Custom Table Entries window is displayed.
- In User Note, enter a description about the table entries that you are editing.
- Select Edit Entries and edit the record details for the different columns of the custom table, or select Append and enter the details for the new record.
- To export the records of the custom table into an Excel workbook, select Export to Excel. The records are exported to an
.xlsxfile in theDocumentsfolder. - To import the records from an Excel workbook, select Import from Excel and perform the following steps:
- Enter the path of the Excel file, select the worksheet containing the records, select First row has column names if the first row in the Excel workbook contains the column headers.
- To add the records from the file, select Append records and select Next. The column mappings are displayed. The option to append records is available only if your user profile has the permission to add records for the custom table.
- To delete the existing records in the table and add the records from the file, select Overwrite records and select Next. The column mappings are displayed. The option to overwrite records is available only if your user profile has the permission to delete records for the custom table.
- Select Import and confirm the import. The import details are displayed.
Note: If the source records contain errors, you can select Allow import of only valid records to continue with the import of only the valid records. Alternatively, correct the invalid source records, and then import them because Easy Workflow does not allow you to import the records containing an error.
- Select Finish. The imported record details are displayed in the Manage Custom Table Entries window.
- Select Save. The changes to the custom table data are saved.


You can also manage the custom tables using the Manage Custom Tables option from the Process Runner tab > Tools (Workflow) dropdown list.
- Use the Custom Tables by Workflow option to view the workflows that use custom tables in the custom code for any workflow step.
- Use the Custom Tables List option to view and edit the data for the custom tables.
Related Topics: