Start Workflow from Process Runner tab, Inbox (Workflow)
This section explains the different ways to start a workflow.
To start a workflow from Process Runner tab, Inbox (Workflow)
- Open Microsoft Excel and select Process Runner.
- In Easy Workflow section, select one of the following options:
- Start Workflow
- Inbox (Workflow), and then in the Easy Workflow Inbox window that is displayed, select Start Workflow.
- Inbox (Workflow) > EShare Files, and then in the Open from EShare Server window that is displayed, select an EShare file, and then select Start Workflow.
Note: The EShare files in Inbox (Workflow) are available only for users with admin role.
- To upload a new Excel file to EShare on which the workflow must be started, in the Select Templates > File Selection Options section, select New File, and then browse to select the Excel file to upload.
- To open a workflow on the currently opened Excel workbook by uploading this file to EShare, select Use Current Filein Select Templates > File Selection Options section. When an Excel workbook is already opened and then you select Start Workflow, the Use Current File option is selected by default.
- To select an EShare template on which the workflow must be started, perform the following steps:
- Select the template from the Templates from EShare section.
- Select the workflow when there is no default workflow assigned to the Excel EShare template. If a workflow is assigned to the file, then depending on the value of Allow user to change selected workflow option selected at the time of assigning workflows to the EShare file, you can change the workflow for this EShare template in the Start Workflow window. For more information about the Allow user to change selected workflow option, see Assign Workflows to EShare Files and Save on EShare.
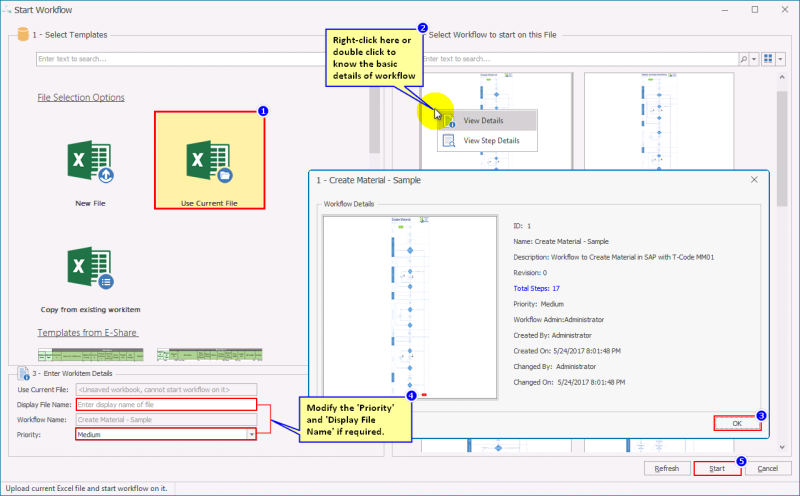
- To view the workflow details, right-click the file, and then select View details, or double-click the file.
To view step details, select View Step Details.
Note: You can search for a file by any field other than those displayed for the EShare templates, such as custom tags, created by, or created on values.
- In Options, you can perform the following steps:
- If the workflow consists of an auto-run step type, select Display Advanced Parameters option, which allows you to select the process name, worksheet, SAP logon and its password for the automated task, and then select Set to save the values entered.
- If the workflow has the User can attach supporting documents option enabled in the Allowed Action tab of the first step of the workflow definition, you can attach supporting documents by selecting Supporting Documents. For information about managing supporting documents, see Manage Supporting Documents.
- In Select Workflow to start on this file, select the workflow from the list that is displayed.
- In Enter Workitem Details, enter the following information:
- Display File Name: Indicates the name that will be displayed for the workflow.
- Priority: Indicates the priority for the workflow.

The Start Workflow window is displayed.


A message is displayed to indicate that the workflow has started.
Alternatively, you can use the Copy and Start New Workflow option from any of the tabs in the Easy Workflow Inbox window to start the workflow on an existing work item; right-click the work item, and then select Copy and Start New Workflow. The Start Workflow window is displayed with the file and workflow selected; you can update the file name and priority in the Enter Workitem Details section.
Related Topics: