Configuring Out of Office
This topic describes how to use the out-of-office feature to dynamically maintain out-of-office status from Process Runner Excel Add-in and send email notifications to substitute users who can perform the necessary action in your absence.
To configure out of office
- In Process Runner Excel Add-in, select one of the following options:
- Process Runner >Tools (Workflow) > Out Of Office
- Process Runner >Inbox (Workflow) > Tools > Out Of Office
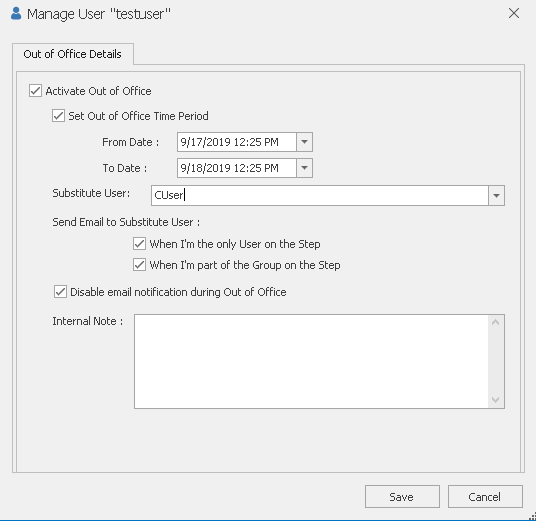
The Manage User "<UserName>" window is displayed.
- If you are not certain when you will be back in office, select Activate Out of Office. The options under the Out of Office Details tab are enabled.
- If you have the information about the period during which you will be out of office, select Set Out of Office Time Period, and then specify the From Date and To Date values.
- In Substitute User, select the user who will be responsible for your workflow-related activities during your absence.
- In Send Email to Substitute User section, depending upon your requirement, select the following options:
- When I'm the only user on the step: Indicates that an email is sent to the substitute user when you are the only user who is assigned a workflow step.
- When I'm part of the group on the step: Indicates that an email is sent to the substitute user when you are a part of a group that is assigned a workflow step.
- If you do not want to receive email notifications when you are out of office, select Disable email notification during Out of Office.
- Optionally, in the Internal Note box, type the message that will be displayed only to the Easy Workflow Administrator or to any user who has the Manage users, user groups, and user roles option selected in their user role.
- Select Save. The out-of-office details are configured.
Note: If you select this option without selecting Set Out of Office Time Period, then you will not get any email notifications until you manually clear the Activate Out of Office option. However, if you have specified the out-of-office period, then you will start getting the email notifications after the period has elapsed.
Related Topics:

