Configure Easy Workflow in Process Runner Excel Add-in
You can configure Process Runner Excel Add-in to connect to an Easy Workflow instance by providing the Easy Workflow database connection information.
To configure Easy Workflow in Process Runner Excel Add-in
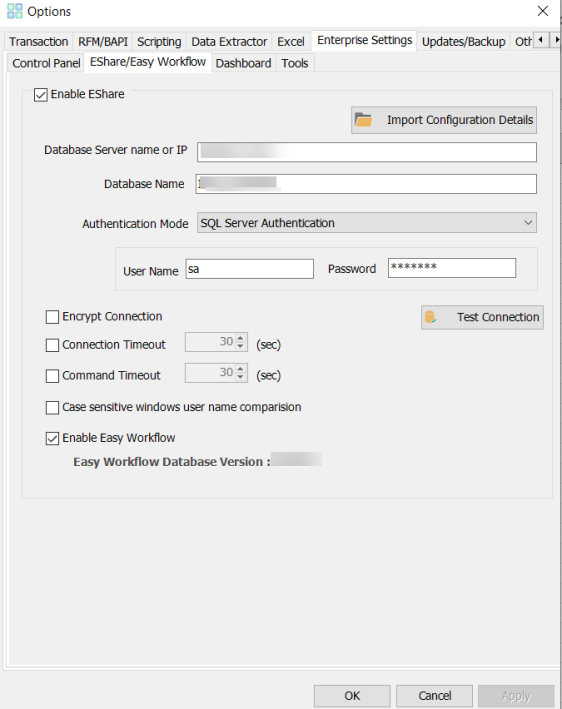
- In Process Runner Excel Add-in, select Tools. The Options window is displayed.
- On the Enterprise Settings > EShare tab, select Enable EShare. The options in the window are available.
- Perform one of the following steps:
- Select Import Configuration Details, and specify the path of
EShareConfig.icffile to configure Easy Workflow in Process Runner Excel Add-in. The configuration information about Easy Workflow database is displayed and Enable Easy Workflow is selected. - Enter the following details, and select Enable Easy Workflow:
- Database Server name or IP: Indicates the host name or IP address of the computer on which Easy Workflow is installed. Specify the port number if you are not using the default value of
1433by including a comma after the IP address or host name. For example,199.xx.yy.xxx, 11111 - Database Name: Indicates the name of the Easy Workflow database.
- Authentication Mode: Indicates the authentication mode that must be used to connect to Easy Workflow. For SQL Server Authentication, user name and password are also required.
Note: You can edit the database details only if Can update EShare configuration is selected in your user profile. For information about the Can update EShare configuration option, see Add, Edit, or Copy User Roles.
- Database Server name or IP: Indicates the host name or IP address of the computer on which Easy Workflow is installed. Specify the port number if you are not using the default value of
Note: You must get the
EShareConfig.icffile from your Easy Workflow administrator. - Select Import Configuration Details, and specify the path of
- To enforce case-sensitive user name comparison while logging onto the EShare server, select Case-sensitive windows user name comparison.
- Optionally, perform the following steps:
- Select Encrypt Connection. TLS 1.2 is used to encrypt communication between Easy Workflow and SQL Server. For information about the required prerequisites to use this option, see Easy Workflow Installation Guide.
- Select Connection Timeout, and enter the time to wait while trying to establish a connection with the Easy Workflow database before ending the attempt and generating an error.
- Select Command Timeout, and enter the time to wait while trying to run a command before ending the attempt and generating an error.
- Select Test Connection. The configuration details are verified.
- Select Apply > OK. The changes are saved and Easy Workflow tab is displayed in the Process Runner ribbon.
Related Topics: