View Easy Workflow Service Status
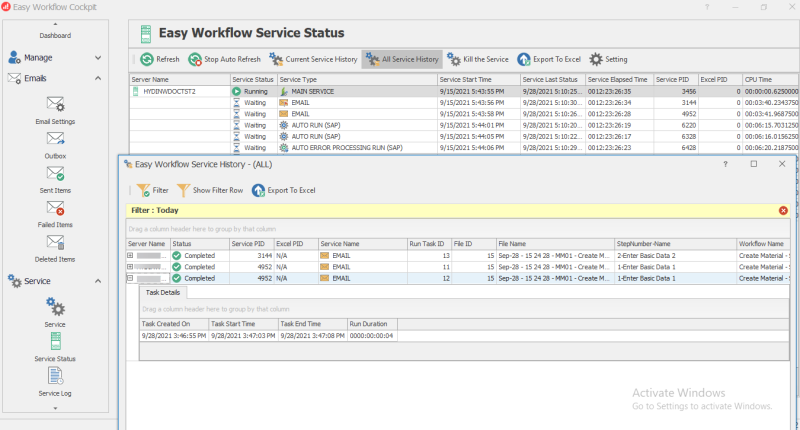
This topic describes the tasks that you can perform in the Easy Workflow Service Status window, which displays the status of all the services installed on all the computers. It also displays the path of the log files generated on server running the service.
To view the service history, stop the service, export to Excel, configure settings
- In Easy Workflow Cockpit, select Service > Service Status. The Easy Workflow Service Status window is displayed.
- To stop the automatic refresh of the list of services, select Stop Auto Refresh.
Note: The list of services is automatically refreshed according to the duration specified in Setting > Refresh after every box.
- To view the history of the selected service, select Current Service History. The Easy Workflow Service History - <NameOfService><ProcessIDEasyWorkflowJobInstance> window is displayed.
- To view the history of all the services, select All Service History. The Easy Workflow Service History - (ALL) window is displayed.
- To stop the service when you notice an unusual behavior of service, such as the service consuming excessive amount of resources, taking a long time to complete, or if the service is stuck in any task, select one of the following options in Kill the Service:
- Soft Kill: Indicates that the service is stopped after the completion of the task that is being run. The service is restarted with a new service Process ID (PID) and the same task is continued. For example, if the memory consumed by the instance reaches 1 GB, you can use this option to stop the instance and a new instance is then be launched.
- Hard Kill: Indicates that the service is stopped instantly even if a task is being run. The service is restarted with a new Service PID and the same task is continued.
- To export the service logs that are displayed in the grid, select Export To Excel, and select the location where the file must be exported to, on the local computer. The
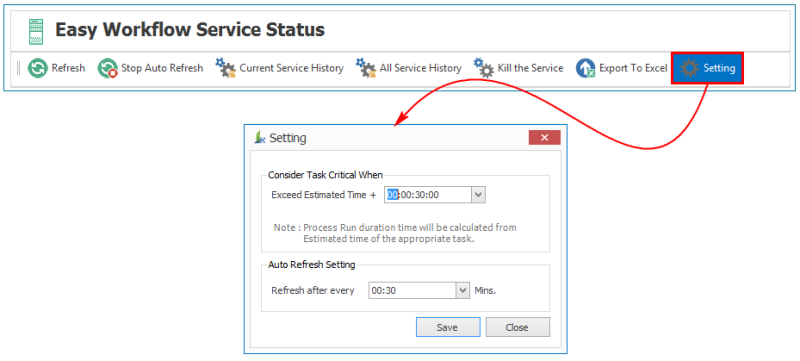
EasyWorkflowServiceData.xlsfile is exported into an Excel workbook. - To set the time duration after which a task must be considered critical or the time duration for automatic refresh, select Setting, and set the duration for the task in the Setting window as follows:
- Exceed Estimated Time +: Indicates the time after which the task is considered critical.
- Refresh After Every: Indicates the time after which the services are refreshed.

Related Topics: