Process Runner Cloud for Users
This section is applicable only if your organization is using the Process Runner Cloud license model. For information about the Process Runner Cloud license model, contact support.
As a Process Runner Cloud user, you can sign into the Process Runner Cloud URL that your organization administrator has provided you. Depending on the permissions assigned to your role, you can perform tasks in EShare, Control Panel, and create other users and roles.
Note: The email ID that you use to sign into Process Runner Cloud is case-sensitive. For example, if your administrator has provided jdoe@DemoOrg.com, you cannot sign in using JDoe@DemoOrg.com or jDoe@DemoOrg.com.
EShare
If your user role has EShare selected by your administrator, depending on the permissions selected for EShare, you can perform tasks such as managing EShare files, sharing the files, and adding tags.
Perform the following steps:
- Sign into the Process Runner Cloud URL for your organization that is provided by your administrator. A page is displayed with the EShare tile.
Note: Depending on the permissions your role is assigned, you might also see the Control Panel tile in the Apps section and the Users and Roles tiles in the Dashboard section.
- Select EShare. The EShare page is displayed.
- To add an EShare file, share the file, and assign tags, perform the following steps:
- In the pane on the left side, select Files. The File Details page is displayed.
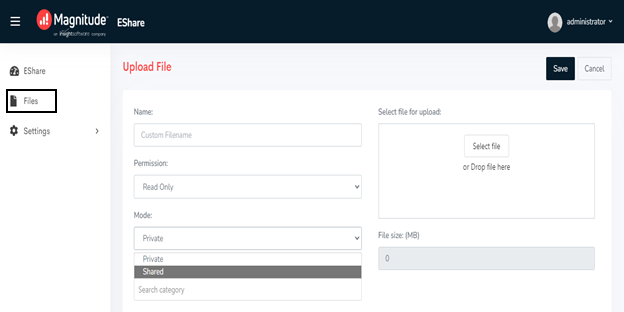
- Select Upload File. The Upload File page is displayed.
- Enter the name for the file in the Name box and select the EShare file in the Select file for upload box.
- From the Permission dropdown list, select one of the following options:
- Read Only: Allows you to open the file in read-only mode. However, you can update the file to run it, but cannot save the updated file to the EShare server.
- Read-Write: Allows you to update the EShare file.
- From the Mode dropdown list, select Private to not share the file with other users and Shared to share the file with the specified users.
- If a category is already available, add the file to the category in the Add file to category box.
- Optionally, you can also add global tags and categories for the EShare files.
Control Panel
If your user role has Control Panel selected, depending on the permissions selected in Control Panel, you can manage and assign permissions to users across your organization at various level using the global controls, users, groups, assigned user groups, database connections, queries, and rules options.
Data Governance
The Data Governance feature of Control Panel allows you to implement field-level quality control over your input data. The data governance rules are configured in Control Panel and consumed by the Process Runner application at run-time. Control Panel allows you to centrally write, manage, store and distribute various data quality rules that you can then apply to individual input fields in Process Runner. The dynamic skip functionality of Process Runner consumes these rules at run-time ensuring that the data the user is trying to send to SAP meets the criteria you have specified in the validation rules.
Perform the following steps to assign database rules:
- Sign into the Process Runner Cloud URL for your organization that is provided by your administrator. A page is displayed with the Control Panel tile.
Note: Depending on the permissions your role is assigned, you might also see the EShare tile in the Apps section and the Users and Roles tiles in the Cloud Hub section.
- Select Control Panel. The Control Panel page is displayed.
- In the pane on the left side, select Data Governance > Database Connections, and perform the following steps:
Select Add Connection. The Add Connection page is displayed.
- In the Connection Name box, enter a name for the connection.
- From the Connection Type dropdown list, select SQL Server, Oracle, or Other.
- Enter additional information depending on the connection type that you have selected.
- Select Save. The database connection details are saved and used to validate the values present in Process files in Process Runner.
- In the pane on the left side, select Data Governance > Queries, and perform the following steps:
Select Add Query. The Add Query page is displayed.
- In the Query Name box, enter a name for the query.
- In the Connect To dropdown list, select Database or SAP.
- Enter additional information depending on whether you are connecting to a database or SAP.
- Select Save. The query details are saved that is used to retrieve the data from the database or SAP table.
-
In the pane on the left side, select Data Governance > Rules, and perform the following to enter custom rule code:
-
Select Add Rule. The Rules page is displayed.
- In the Rule Name box, enter a name of the rule.
- From the Access Type dropdown, select Active or Inactive.
- In the Description box, enter the description of the rule.
- In the Code box, enter the rule code.
-
-
Select Save. The rule details are saved.
Global Controls
The Global Controls feature of Control Panel allows you to centrally assign technology settings to a user. Perform the following steps to assign global controls:
-
In the pane on the left side, select Global Controls. The Technology Settings page is displayed.
-
Select any of the following technology permissions:
-
Allow Transaction: When enabled, the user can run Transaction technology.
- Allow BAPI/RFM: When enabled, the user can run BAPI/RFM technology.
- Allow GUI Script: When enabled, the user can run GUI Scripting technology.
- Allow Data Extractor: When enabled, the user can run Data Extractor technology.
-
-
Select Update. The Technology Settings are assigned.
Groups
The Groups feature of Control Panel allows you to create a user group and grant permissions to different technologies for that user group. Perform the following steps to create a user group and grant permissions:
-
In the pane on the left side, select Groups.The Groups page is displayed.
-
Select Add Group. The Add Group page is displayed.
-
In the Basic Details > Group Name box, enter a group name.
-
In the Other Settings box, select any of the following technologies depending on the access required for the group:
-
Allow Transaction
- Allow BAPI/RFM
- Allow GUI Script
- Allow Data Extractor
-
-
Select Save. The group with specific technology permissions is created.
Users
The Users feature of Control Panel allows you to modify primary settings of a user. Perform the following steps to update the settings of the user:
-
In the pane on the left side, select Users.The Users page is displayed.
-
Select Update User. The Update User page is displayed.
-
From the User Name dropdown list, select the user.
-
In the Settings section, select either the Run Only or Designer permission.
-
Select any of the following technologies from Technology Settings depending on the user role:
-
Allow Transaction
- Allow BAPI/RFM
- Allow GUI Script
- Allow Data Extractor
-
-
Select Save. The details of the user are updated.
Assign User Groups
The Assign User Groups feature of Control Panel allows you to assign users to the relevant groups. After creating a User Group, the user can be assigned to multiple user groups. Perform the following steps to assign users to groups:
-
In the pane on the left side, select Assign User Groups.The User Groups page is displayed.
-
Select Add User Group. The Assign User Groups page is displayed.
-
From the Select Group dropdown list, select the group.
-
From the Select User dropdown list, select the users.
-
Select Assign User Group. The users are assigned to the group.
Administrator Privileges
If your user role has Administrator Privileges selected, depending on the administrator permissions selected, you can manage users and roles.
Perform the following steps:
- Sign into the Process Runner Cloud URL for your organization that is provided by your administrator. A page is displayed with the Users and Roles tiles.
Note: Depending on the permissions your role is assigned, you might also see the Control Panel and EShare tiles in the Apps section.
- Perform the following steps to add a role:
- Select Roles. The Roles page is displayed.
- Select Add Role. The Add Role page is displayed.
- Enter the information in the Name box which is a mandatory field.
- Optionally, enter the Normalized Nameand description for the role.
- Expand the following modules to select tasks that the users for the role can perform:
- Control Panel: Allows users to perform Control Panel tasks, such as managing queries or rules.
- Process Runner: Allows users to use Process Runner to design and run Process files.
- Administrator Privileges: Allows users to perform administrator tasks, such as managing roles or users.
- EShare: Allows the user to perform EShare tasks, such as sharing EShare files or editing the EShare files.
- Select Save. The user role is added.
- Perform the following steps to add a user:
- Select Users. The Users page is displayed.
- Select Add User. The Add User page is displayed.
- Enter the login email ID for the user in the Email box, display name, and password.
- Select the roles from the Role dropdown list and select Assign Role. The role is assigned to the user.
- Select Save. The user is assigned the selected role.