Dashboard
This topic describes how to configure the options of the Dashboard tab.
Dashboard enables you to view graphically how Process Runner is used within your enterprise. You can view reports, metrics and key performance indicators (KPIs).
To configure the options on the Dashboard tab
- In Process Runner, select Tools > Options. The Options window is displayed.
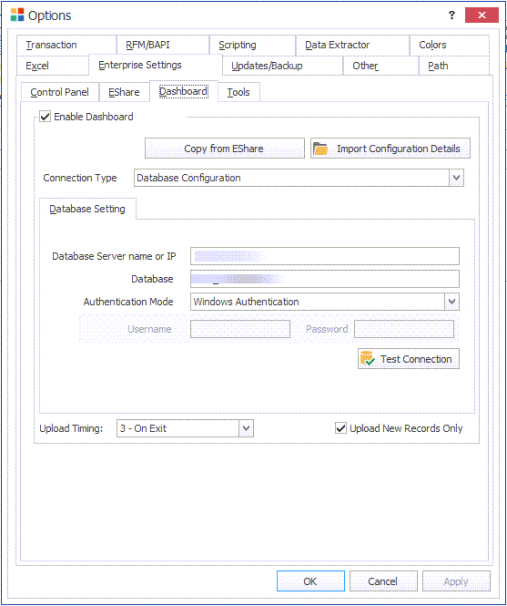
- On the Enterprise Settings > Dashboard tab, select Enable Dashboard. The options in the window are available.
- Optionally, select Copy from EShare. The configurations of the EShare tab are copied to Database Setting of the Dashboard tab.
- To import and use the existing Dashboard settings for configuration of EShare, perform the following steps:
- Select Import Configuration Details. The Dashboard Config file dialog box is displayed.
- Browse and select the
DashboardConfig.icffile. The configuration information is automatically populated in the appropriate fields.
Note: The configuration information about Dashboard is displayed in the different boxes of Database Setting or Service Setting. You must get the
DashboardConfig.icffile from your Dashboard administrator. - To configure Dashboard using a web service or database connection, perform the following steps:
- In Connection Type, select Service Configuration or Database Configuration. The configuration-specific properties are displayed.
- If you select Service Configuration in Connection Type, enter the following details, and test the connection:
- URL: Indicates the URL of the Dashboard instance.
- Use Default: Indicates that the default credentials are used to connect to Dashboard. The User Name and Password options are not available for this option.
- User Defined: Indicates that the domain name and password are used to sign in to Dashboard.
Note: Ensure that you get the required details from your Dashboard administrator.
- If you select Database Configuration in Connection Type, enter the following details, and test the connection:
- Database Server name or IP: Indicates the host name or IP address of the computer on which Dashboard is installed. Specify the port number if you do not use
1433as a default value and a comma after the IP address or host name. For example,199.xx.yy.xxx,11111. - Database Name: Indicates the name of the Dashboard database.
- :Authentication Mode Indicates the authentication mode that must be used to connect to Dashboard. For SQL Server Authentication, user name and password are also required.
- Database Server name or IP: Indicates the host name or IP address of the computer on which Dashboard is installed. Specify the port number if you do not use
- If you select Service Configuration in Connection Type, enter the following details:
- URL: Indicates the server URL of the Dashboard instance.
- Use Default: Indicates that the default credentials are used to sign in to Dashboard. The User Name and Password boxes are not available for this option.
- User Defined: Indicates that the domain name and password are used to sign in to Dashboard. Ensure that you get the domain credentials from your administrator.
- Select Test Connection. The configuration details are verified.
- In Upload Timing, select one of the following options:
- Manually: Indicates that the records are uploaded manually.
- End of Each Run: Indicates that the record are uploaded automatically after the successful run of the Process file.
- On Exit: Indicates that if an error occurs in the first collective file run, then Process Runner logs the error in a log file and continues the run of the other files in the collective run.
- Optionally, to upload only the new records that eliminates the replication of the records, select Upload New Records Only.
- Select Apply and then OK. The changes are saved.
Note: Copy from EShare is available only when EShare in the Options window is selected.