Schedule
This topic describes how to use the SCHEDULER tab to schedule tasks to run the Process files. After creating tasks, you can view, edit, delete, or refresh the scheduled tasks. You can lock the Process file to protect the scheduler settings using the Lock File option.
Refer to the video to understand the scheduler functionality.
To create a task
- In Process Runner, select SCHEDULER > New. The Create Task window is displayed.
Note: If the Process file is locked to change the scheduler settings, you cannot create a scheduler task or edit, enable or disable and delete the current scheduled task. To create a new task or edit the scheduler settings, select the lock icon. If the task is password-protected, then click the lock icon and specify the password in the dialog box that appears.
- To configure general settings, on the General tab, perform the following steps:
- To provide a name for the task, enter a suitable name in the Task Name field.
- Select Local or EShare for the type of Process file and browse to the Process file. The Process file is selected.
- To describe the task, enter the description in the Description field.
- To connect to SAP, select a logon shortcut from the Logon Shortcut dropdown list.
Note: You must provide a logon shortcut in order to log on to SAP and run the scheduling job. Therefore, ensure that the Process file is saved with a logon shortcut.
- To run the scheduled task without getting an error pop-up in during runtime, select Silent Mode. Running a scheduled process file in silent mode differ for single process file, connected Process file and collective run process file.
- Single Process Scheduled: Indicates that Process Runner runs the Process file without error message pop-up during the run and log the error in log file.
- Connected Process Scheduled: Indicates that if an error occurs in any of the files, then the scheduled process stops the run at that file and does not run the other Process files and logs the error in the log file.
- Collective Run Scheduled process: Indicates that if an error occurs in the first collective run file during the run, then Process Runner logs the error in the log file and continues the run of the other files in the collective run.
- To configure the trigger settings, select the Trigger tab, and perform the following steps:
- In Schedule Type list, select the scheduling type category from the following options:
- Daily: Indicates that the scheduled task runs on a daily basis. The Daily trigger is based on a recursion system, date and the time, you want to start using this kind of trigger. The interval of one is for creating a daily schedule, the interval of two is for creating an every other day schedule and so on.
- Weekly: Indicates that the scheduled task runs on a weekly basis. If you select Weekly trigger, you must enter the date and time on which you want to start this schedule, the days when you want the schedule to take place and how often to repeat. Recursion of this trigger is similar to the daily one. For the interval of one, the task will be repeated weekly, for the interval of two, the task will be repeated every two weeks and so on.
- Monthly: Indicates that the scheduled task runs on a monthly basis. The Monthly trigger does not have many differences from the others, you only need to select the month and day that you want to activate your task. The recursion system is the same, the only difference being that the minimum interval of repetition is one month. You can either select one month or all twelve months.
- Once: Indicates that the scheduled task runs only one time. Specify the day and time on which the task must be run.
- When Idle: Indicates that the scheduled task runs only when the system is on idle mode.
- To schedule the start time for the task, select the Start DateTime.
- To repeat, stop and expire a task, in Advance Settings, select the following options :
- Every: Indicates how often (in minutes or hours) the scheduled task is repeated. Scroll the arrows to select other settings.
- Until: Indicates the time duration until which the task must be repeated.
- If the task is still running, stop it at this time:Indicates whether all instances of the scheduled task that are still running according to the deadline are stopped at Until. This option is useful if the scheduled tasks don't stop automatically. If this check box is not selected, the task continues running, even after the deadline.
- To stop the auto-run, select the Expiry DateTime.
- In Schedule Type list, select the scheduling type category from the following options:
- To configure further settings, select the Settings tab, and perform the following steps:
- To configure the Scheduled Task Completed settings, perform the following steps:
- Delete task if it is not scheduled to run again: Indicates whether the task file is deleted from the computer's hard disk after the run and is not scheduled to run again. This option is useful for tasks that are scheduled to run only once.
- Stop task if it runs for: Indicates whether the task is stopped after it has been running for a specified amount of time. Select the time in Hr(s) and Minute(s) at their corresponding fields.
- To configure the Scheduled Task Missed settings, select Run task as soon as possible after a scheduled start is missed. If the computer is turned off, it is possible that a triggered time event might not happen. This setting allows scheduler to go back and see that it was supposed to run, and then trigger it to run right away.
- To configure the Idle Time settings, perform the following steps:
- Only start the task if computer has been idle for at least: Indicates whether to initiate the scheduled task after the specific period of freeze time (i.e. pause in the usage of keyboard and mouse). If the task is scheduled to repeat, the first run of the task occurs only if the computer has been idle for the specified period of time. If the computer is not idle when the task tries to start, the scheduler keeps checking if the computer is idle for the amount of time specified in Only start the Task if the computer has been idle for at least. If the computer does not become idle during this time, task is not run.
- Stop the task if computer ceases to be idle: Indicates whether the task must be stopped if the usage of the computer is resumed during the runtime of a task.
- If computer has not been idle that long, retry for up to: Indicates the time (in minutes) for which the scheduler keeps verifying to ensure that the computer is idle. If the computer has not been idle for that long, no occurrences of the task are run.
- To configure the Power Management settings, perform the following steps:
- Don't start task if computer is running on batteries: Indicates whether the scheduled task is prevented from starting while your computer is running on batteries. Some programs frequently access your hard disk, which drains the batteries faster. Select this option to extend the life of your batteries.
- Stop task if battery mode begins: Instructs the Process Runner to stop the running the ongoing task if the computer starts running on battery.
- Wake the computer to run the task: Indicates that the computer will wake to run the task at the scheduled time, even if the computer is in sleep mode.
- To configure the Scheduled Task Completed settings, perform the following steps:
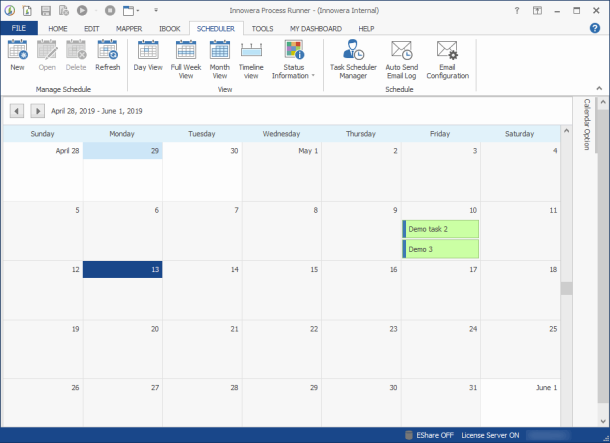
- Select Save > Close. The scheduled task is displayed in green color in the calendar. By default, your calendar displays the monthly arrangement of the calendar view and could limit the number of calendar items visible on each day and the amount of detail visible for each calendar item.
- Optionally, perform the following tasks:
- Select one of the following options to view the scheduled tasks:
- Day View: Displays one day at a time separated into half-hour increments.
- Full Week View: Displays one calendar week (Sunday through Saturday) at a time. The default work week is Monday through Friday from 12:00 A.M. to 12:00 P.M. Time slots that fall within the work week are white on the calendar; time slots outside of the work week are colored.
- Month View: Displays one calendar month at a time, in addition to any preceding or following days that fall into the displayed weeks.
- Timeline view: Displays a horizontal view of the calendar for the selected time period. This view is very useful for comparing limited time periods for multiple calendars.
- Use the Status Information to view the status of the task and the type of Process file that is scheduled.
- To configure the display options, select the following options:
- Display Option
- End Time: Displays the end time of those scheduled tasks for which end time is not set.
- Display Clock on Scheduled Task: Displays the clock with the start time of the scheduled task.
- Display Only Current File Scheduled Task: Displays only the tasks that are created for the current process file.
- Scheduled Current Process File List: Displays the list of scheduled tasks created for current process file.
- Date Navigator: The date navigator (little calendar) on the right-pane, indicates today’s date. The day you are currently viewing is shaded in with dark gray color, in this case May 13, 2019. To change to a new day you can click any date in the date navigator, or use the navigation buttons along the top of the calendar.
- Display Option
- Select one of the following options to view the scheduled tasks: