Log
This topic describes how to view the logs in Process Runner. The logs record each activity from the start to the exit of a session in Process Runner.
To configure log details
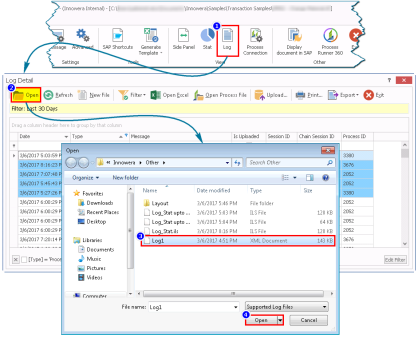
- Select Home > Log. The Log Detail window is displayed. To open an existing log file, perform the following steps:
- Select the
Log1.xmlfile that must be opened and select Open Process File. The Open Process Runner File dialog box is displayed. - Select Yes. The selected file is opened.
Note: The log file that is to be loaded should be necessarily renamed as
Log1.xml. - Select the
- To update the background changes that took place after opening the Log Detail window, select Refresh. The log list changes are appended to the grid in the Log Detail window.
- To save an existing log file and initiate the session for a new log file, select the New File option. The existing log file is saved with an auto-generated name in the default Stats folder. The saved log file name is displayed in the grid of the Log Detail window.
- To modify the grid view based on the available filter options, select one of the sub-options under Filter option. The records are displayed as per the selected date range. The sub-options are as follows:
- All: Displays all the records.
- Today: Displays the records for the current day.
- Yesterday: Displays the records for the previous day.
- Last 2 Days: Displays the records for the last two days.
- Last 10 Days: Displays the records for the last 10 days.
- Last 20 Days: Displays the records for the last 20 days.
- Last 30 Days: Displays the records for the last 30 days.
- Custom: Displays the Custom Date window. Select date from From Date and To Date options and select OK. The records are displayed as per the customized date range.
- To open an Excel file from the Log Detail window, perform the following steps:
- Filter Excel File Name from the filter list of Type column header. All the Excel files are listed.
- Select the required log record with the Excel file path in message column and select Open Excel. The Excel file is opened only if it exists at the mentioned path.
- To open a Process file from the Log Detail window, perform the following steps:
- Filter Process Name from the filter list of Type column header. All the Process files are listed.
- Select the required log record with the Process file path in message column and click on Open Process File. The Process file is opened only if it exists at the mentioned path.
- To upload the logs to Dashboard server that is configured in the Tools > Options > Enterprise Settings > Dashboard tab, perform the following steps:
- Select Upload. The Upload to Dashboard Server window is displayed.
- To upload just the new records, select Upload New Records Only > Upload Now. The previous records are not uploaded.
- Optionally, deselect Upload New Records Onlyand select Upload Now. All the log records are uploaded to the Dashboard Server and a success message is displayed.
- To modify the grid layout, perform the following steps:
- Select Customization. The Customization window is displayed.
- Drag the column headers available in the Customization window to the grid header. The details are grouped under the added header.
- Optionally, drag the columns already present in the grid to the Customization window. The columns are deleted from the grid. Therefore, the Customization window serves as a storage of columns that can be used to customize the grid layout view.
- Select Print. A print preview of the existing logs is displayed.
Note: You can configure the print settings by using the available options.
- To export the logs to an Excel (
.xlsor.xlsx) or a Text (.txt) file format to your local drive, select Export. A dropdown list is displayed.- Select one of the following options:
- Export to XLS
- Export to XLSX
- Export to Text
- Browse to the folder in the local drive and select Save. The log file is exported in the selected format.