Map Excel Header
This section describes how to manually map the fields with the Excel columns or Excel header cell after the recording in SAP is completed. When you complete and save the recording, the Mapper tab in Process Runner is displayed with the recorded script. The Mapper tab includes the following:
- Mapper: Displayes the fields for all the items that you selected when recording the transaction.
- Excel: Displays a preview of the Excel worksheet where the SAP fields selected from Mapper are (already) mapped.
To manually map a field with Excel header cell
- Open the Process file that you want to update and go the Mapper tab.
- Ensure that Show/Hide Excel Data and Show/Hide Excel Toolbar options under Excel View are selected.
- For a Transaction, BAPI/RFM, or GUI Scripting Process file, select the mapping type to Excel to SAP (or SAP to Excel for a Transaction, BAPI/RFM, or Data Extractor Process file) and perform one of the following steps:
- In Map Value, enter the header cell name within square brackets.
- Select Map Excel Header and move a non-empty header cell to the mapper.
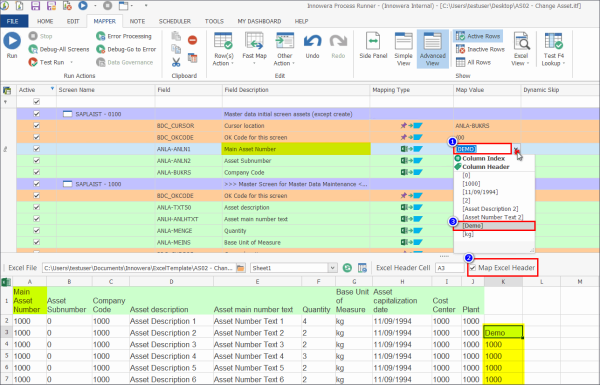
- In Map Value, select the Excel column header from the dropdown options that you want to map as header cell. Similarly, in Block Value, you can also select Excel column header for the fields that you want to include in the loop. For example, if you want to map cell K3 as the header cell for Main Asset Number, you can either enter header cell name Demo within the square brackets, or select Map Excel Header and move column K to mapper, or select the value from the dropdown options as shown in the following screenshot.
- Save the Process file and select Run. The Process file retrieves the data according to the mapping value that is set.